This is a really different post from my usual blogging about my photography. I actually did some web development long before I started my photography business, and it really helped me out when I started my business back in 2008. When I built my first site, I just used static html pages and had a separate blog running on Wordpress. A number of years later, I switched my entire site to Wordpress. With some page caching techniques, Wordpress can be just as fast as static web pages.
While you can find very cheap web hosting, for example around $5 a month, it’s very slow, and you share resources with many other sites. On the other hand, you can purchase managed Wordpress hosting that is very fast on a site like WP Engine. There you are spending around $100 a month, if you want to host multiple sites and have decent storage. Google partially ranks pages based on speed, and with an update coming soon, they are making this even more important. So website speed is very important.
Info about abbreviations I use below:
CDN = Content Delivery Network
AWS = Amazon Web Services
VPS = Virtual Private Server
Can I have ultimate Wordpress speed for $10 a month?
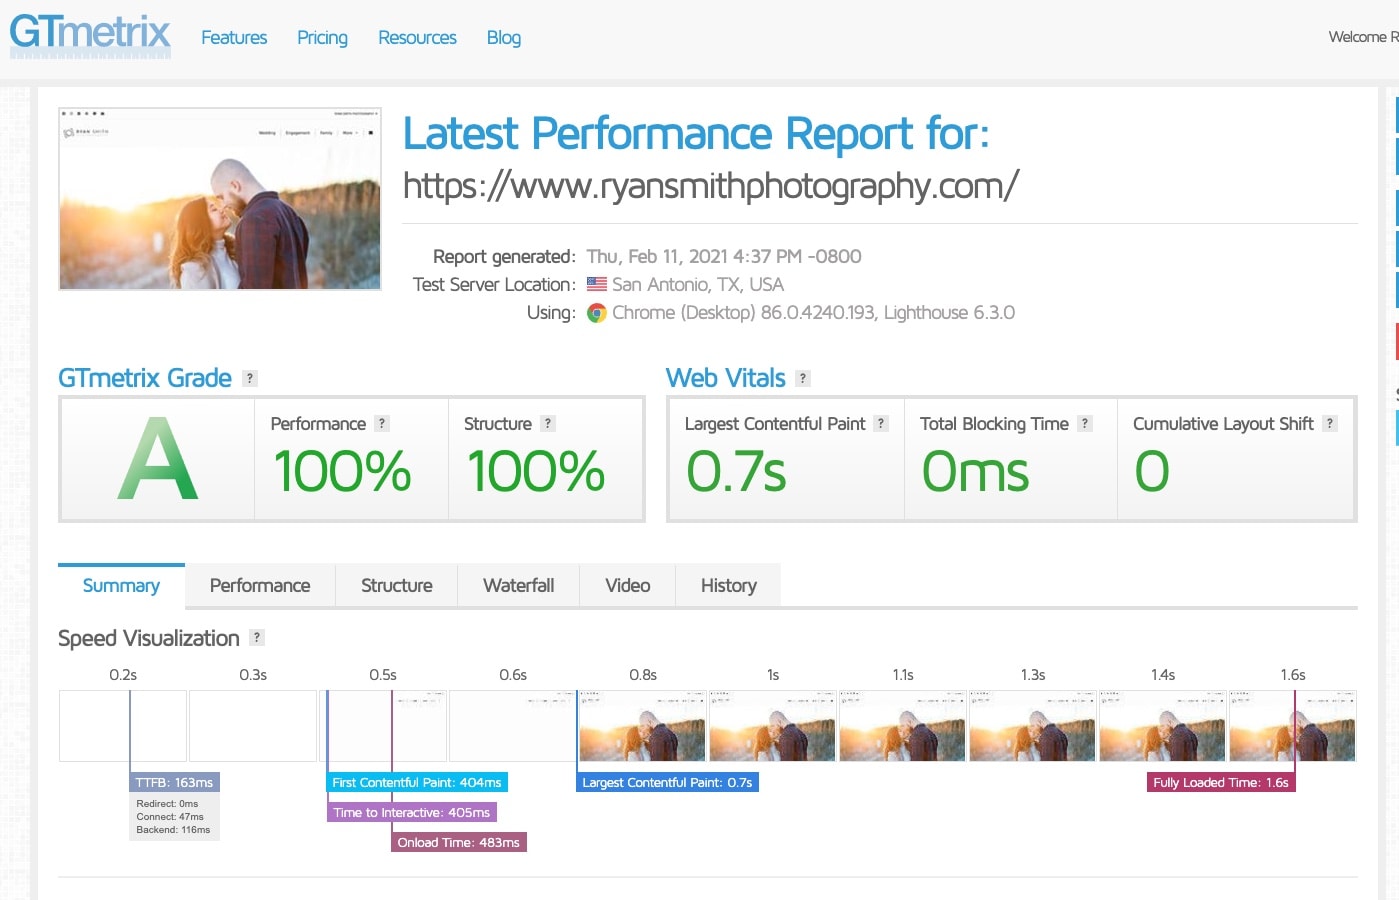
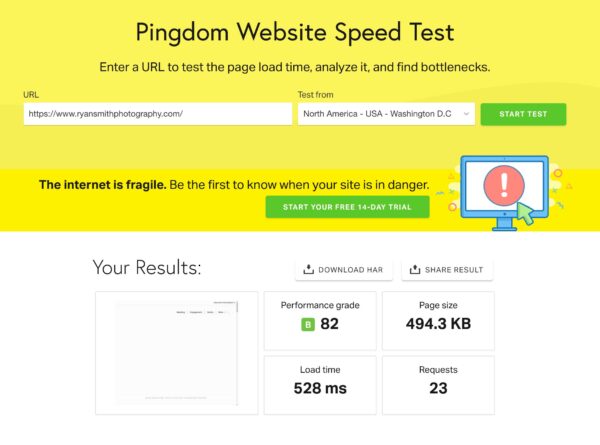
Yes you can! Run some tests on the speed of this website. It is incredibly fast. It typically loads most pages in about half a second. Ignore the performance grade, this is because Pingdom doesn’t test some things like gzip properly, just check out the actual load time. I’m also running this site with the Google AMP for Wordpress plugin which helps with some best practices for speed.
Amazon has a Web Service called Lightsail that makes it relatively easy to setup your own virtual private server to host Wordpress. The also have a new service called Lightsail Distributions that puts your web server behind the AWS CDN, so resources are served from close to your visitors origin. For example, if you have a website visitor from Europe, instead of the website loading from the USA, it will be cached and sent to them from a server in Europe.
The pricing for all this is incredibly good, you are getting more SSD storage and freedom than with many expensive Wordpress hosting plans, you just have to do everything yourself. Also, there is basically no free support from Amazon for Lightsail. You have to dig through support documents and learn on your own. Setup of the VPS isn’t too hard, but I found the CDN distribution to be quite confusing.
Step by Step instructions for a super speed NGINX Wordpress server setup
So why am I making this post? While most of what I’m writing here can be found by searching around through various help documents, I wanted to make a simple step by step, if you would like to setup a server just like mine. There is no help document I’ve seen that combines all the techniques I list below. Also, while I have all this setup in my mind, I want to write it down! This way it will be easy if I have to do this again in the future. I’m not going to explain everything in detail, I’m just going to tell you the basic steps. If you want to understand more about what you are doing there is lots of documentation online.
Step 1: Create an Amazon Lightsail Server Instance
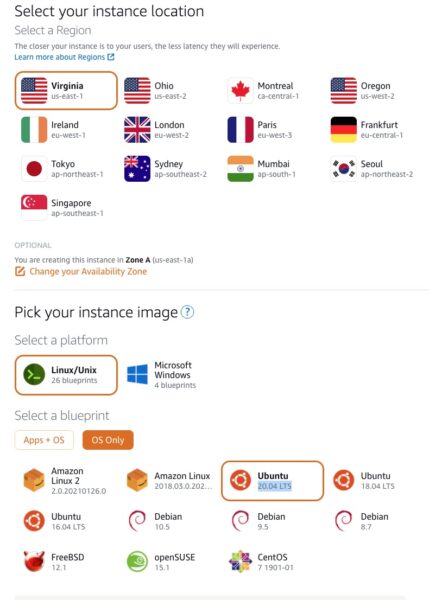
Go here https://aws.amazon.com/lightsail/ and setup a Lightsail hosting account with Amazon. Under the Instances tab, click the “Create Instance” button. You have some choices to make. First of all pick an Instance Location close to where most of your website users will come from. This will matter less with the CDN setup later, but it is still important. It may be tempting to just click the WordPress Apps+OS selection. This will make setup extremely easy, it will create a wordpress website and do everything for you. However, I’m going to show you a way to make a faster NGINX server that gives you more control and lets you host many separate websites on one server if desired.
Under Select a blueprint, choose “OS Only” then choose Ubuntu 20.04 LTS, the latest Ubuntu LTS version as of the date of publishing. Under choose your plan, I recommend picking the $10/month plan. This gives you a very comfortable 2GB of ram and 60GB SSD space. Personally I chose the $20/month plan because I want the extra ram and extra cpu for hosting multiple sites. But I’m probably wasting $10/month, I really don’t need it.
I also recommend clicking Enable Automatic Snapshots. These will cost a couple of dollars a month, but they make regular backups of your server incase anything goes down in the future. Leave everything else the same and click “Create Instance” at the bottom of the page.
Step 2: Give your server a static ip address and switch to AWS DNS
You now have your very own web server running on the AWS cloud! Now you have to get Wordpress running on it and your domain to point to it. First of all, click the Networking Tab, and select “Create Static IP”. Under “Attach to an instance”, select the instance you just created and click the “Create Button”. This will give your server a permanent ip address location on the internet.
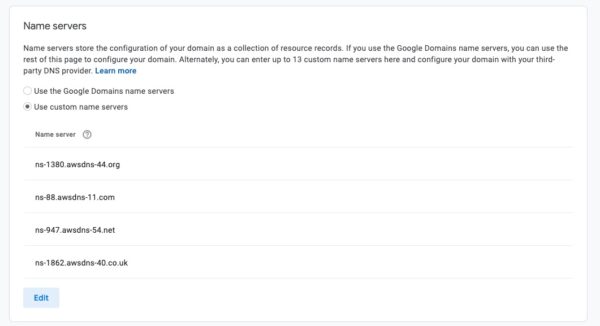
Select the “Networking” Tab Again. This time select “Create DNS Zone”. Enter your domain name, for example, mine is ryansmithphotography.com. Then select “Create DNS zone”. After you do this you will be given a list of Name Servers. Go to the site where you purchased your domain name. For example I purchase my domains through Google Domains. Other popular registrars are GoDaddy and Namecheap. Find on these sites where you can change your name servers and enter the custom AWS name server addresses. More instructions can be found here. This will allow AWS to handle your website DNS, which is necessary for the next step.
Step 3: Create your Lightsail CDN Distribution and attach to your instance ( This makes your site super fast )
The following setup will distribute your resources at various locations around the world using the AWS CDN. This is similar to a very popular service called Cloudflare, however using the AWS CDN has advantages over Cloudflare, such as selecting headers to send and cache based upon. This allows you to serve webp images to supported browsers, which isn’t possible without a paid Cloudflare subscription. There are other advantages as well, such as your own ssl certificate, and the performance should be better than free Cloudflare as well.
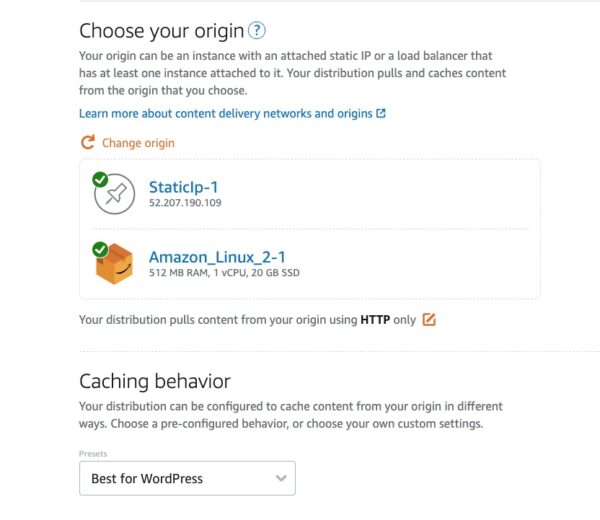
Now go back to the “Networking” tab. We should already have a Static IP Address as well as a DNS Zone listed. Now we create our CDN Distribution. Click the “Create Distribution” button. Under “Choose your Origin”, pick the Lightsail Instance you created in Step 1. It should show your Static IP as well as Instance name. Under Caching Behavior pick “best for wordpress”.
(Optional) Special tweak I discovered to serve Webp images to compatible browsers
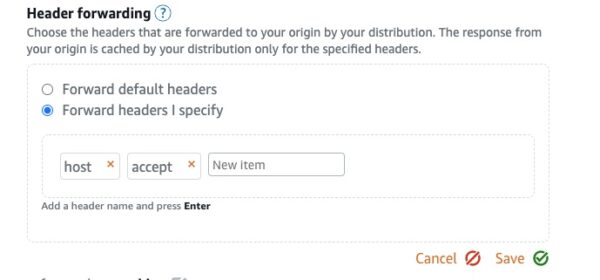
This is a special tip you won’t find anywhere else. The NGINX configuration, which we will install later, automatically serves webp images if they are available from a plugin such as Shortpixel and if they end in .jpg.webp. With a CDN such as Cloudflare, it caches only one version of an image, this can break non webp compatible browsers. So Cloudflare is not compatible with something like Shortpixel serving WebP versions from the front-end without altering the page code.
I’m not going to go into detail but you can read more here https://help.shortpixel.com/article/286-how-to-serve-webp-files-using-spio. If you want to serve WebP versions, using Shortpixel or something similar, you must forward the “accept” header to the Lightsail CDN. To do this, under Advanced Cache Settings, select “Header Forwarding”, “Forward Headers I specify”, and add accept as a new item. This basically tells the CDN to create a separate cache file depending on if the browser supports webp or only jpeg images. Remember to press enter and save.
Next select your Distribution Plan, the 50GB/month should be plenty and it’s free for the first year. It’s only $2.50 per month after that! Then click “Create Distribution”. Now under your distribution you just created, select the “custom domains” tab. First, under Certificates select “create certificate”. Enter your domain name of your website, for example ryansmithphotography.com and www.ryansmithphotography.com. This will provide one or two cname records you need to add to your dns settings. Please copy and paste these into a notes document, you will need them later.
Step 4: Configure your DNS Zone
Go back to the Lightsail home page, you can click the logo at the top. Go back to the “networking tab” and click the DNS Zone you created. You need to add any DNS records that you had previously. Check your domain hosting such as at GoDaddy etc, copy any DNS records you find except for your A record and add them to your DNS Zone at Amazon. This is especially important if you host your own email at your domain, make sure to copy the MX records over.
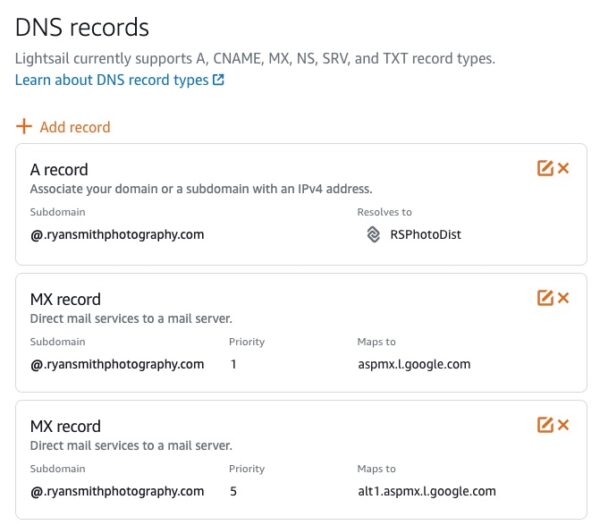
Your A record is what connects your domain name, such as ryansmithphotography.com to your new web server. Click “add record”, select A record, under “Subdomain” enter the @ symbol, and under “Resolves to” select your distribution. Also add the cname records I told you to copy and paste into a document in the last step. Just add them as Name and Value just as you see them, except for the “Name:” value, leave off the .yourdomainname.com at the end. For example, don’t paste in the .ryansmithphotography.com part of the name value, it’s redundant.
Now give this some time to validate. Then go back to your Networking tab, select your distribution, go to the Custom Domains tab, and select the “Enable Custom Domains” check box. This will only work once your Certificate is validated. If the certificate doesn’t validate after a few hours, make sure you entered the cname values in correctly in the last step.
Step 5: Configure your NGINX web server using WordOps
Now for the fun part. You have your server running, your dns is configured, your domain name points to your server, and you are behind the super fast AWS CDN. But you have no website!
Go back to your Lightsail home page, under your instances click the three dots and select connect. Your are now looking at a command line interface to your server running on AWS. Go to the WordOps home page here. Wordops is a script to make it easy to setup NGINX, create a database and install all necessary packages to run Wordpress. It also configures best practices for NGINX to host Wordpress. Follow the One-Step Automated Install process, it’s just one command. Or follow what I list below.
Enter the following commands in order, select yes to any questions:
sudo -i
apt update
apt upgrade
wget -qO wo wops.cc && sudo bash wo
Now that WordOps is installed, it’s easy to create Wordpress sites on your server. You can find more info here https://docs.wordops.net/getting-started/creating-sites/. This is how I recommend creating your first site, but you can create as many as you like. For this setup, we are deliberately not using letsencrypt on the server, ssl is being handled by the distribution.
Enter the following command
wo site create yourdomainname.com --wpredis --php74Of course replace yourdomainname.com with your domain name! This will setup a Wordpress site with redis caching and php 7.4. You don’t need any caching plugins like WPRocket or WPSuperCache with this install. The caching is now done on the server level. Very Important: After you install your website, please make note of the username and password of your wordpress admin and other settings. Your will need these later. There is a lot more you can do with WordOps, please read their documentation for more.
I also recommend configuring automatic updates, you can find a tutorial here https://help.ubuntu.com/community/AutomaticSecurityUpdates?_ga=2.12899127.1830712473.1613088360-1101157258.1613088360
Step 6: Setup website for HTTPS
You should almost be done now. One other step is to get https working correctly. For more details view the documentation here https://lightsail.aws.amazon.com/ls/docs/en_us/articles/amazon-lightsail-editing-wp-config-for-distribution.
For our server setup type in the following command, replace mydomainname.com with your website domain name.
nano /var/www/mydomainname.com/wp-config.phpThis will open up a basic text editor. Use your arrow keys to navigate the file. Scroll down to where it says “That’s all, stop editing!” and paste in the following code on a blank line. Position your cursor where you want to paste, right click and select paste. The hit control v to exit the file and select save. If you mess something up, just exit but don’t save.
define('WP_SITEURL', 'https://' . $_SERVER['HTTP_HOST'] . '/');
define('WP_HOME', 'https://' . $_SERVER['HTTP_HOST'] . '/');
if (isset($_SERVER['HTTP_CLOUDFRONT_FORWARDED_PROTO'])
&& $_SERVER['HTTP_CLOUDFRONT_FORWARDED_PROTO'] === 'https') {
$_SERVER['HTTPS'] = 'on';
}
If you are using the Shortpixel plugin to generate webp images, also add this to your wp-config.php file. This switches Shortpixel to generate webp images that end in .jpg.webp, this is required for WordOps to send them instead of jpeg images. More info here.
define('SHORTPIXEL_USE_DOUBLE_WEBP_EXTENSION', true);Step 7: Visit your site and setup Wordpress
Your website should be working now if everything was done correctly. Login using your credentials you saved during setup and begin setting up wordpress. There is a lot more to having a fast site than just the hosting, but this will give you a great base to build a fast site. If you are migrating from your previous hosting, I recommend backup and restore using UpdraftPlus Backup plugin. If all this is too complex let me know, I will setup a server for you for a fee. If you are having any issues let me know in the comments!
not working for me , it still loading content from instance instead of CDN random url
Sorry I really don’t understand your question.
Hey Ryan! Are you still using AWS Lightsail?